Gaius
- DISCLAIMER
- Welcome to the Gaius Cicereius Docs!
- Configuring Gaius
- Modules
- Moderation
- Auto-moderation
DISCLAIMER
DISCLAIMER ABOUT THE DOCUMENTATION
THIS DOCUMENTATION IS SEVERAL YEARS OUT OF DATE. IT IS BEING KEPT UP FOR THE SAKE OF THE INFORMATION THAT STILL IS IN DATE.
PLEASE CHECK HELP EMBEDS IF FUNCTIONALITY DOES NOT WORK AS INDICATED ON THIS WEBPAGE OR CHECK THE NEW DOCUMENTATION TO SEE IF THE COMMAND YOU ARE LOOKING FOR HAS BEEN UPDATED
THANK YOU
Welcome to the Gaius Cicereius Docs!
Gaius Cicereius (or Gaius for short) is the moderation and utility bot dedicated to keeping your community and people secure and safe from raids, harmful/hateful content, and spam while offering a wide range of intricate features such as multiple filters for additional layered security; organizable, uploadable, and shareable wordlists for managing a network of communities; and customizable configurations for fine-tuning your securities in finesse.
The purpose of this documentation is to provide an in-depth comprehensive guidance and walkthrough on every module, feature, and command for Gaius Cicereius and provide detailed examples and explanations to foster greater understanding of everything Gaius.
Gaius Cicereius is split into modules, in which a set of relevant commands are grouped into, and these docs will provide a rundown of each module and their associated commands in a top-down approach.
Some features require the paid version of Gaius called Gaius Cicereius+.
Setting Up Gaius
When Gaius is in your server, you'll notice that no bot role is created in the bot's name. The very first task is to create and/or assign a role to Gaius if you want Gaius to moderate your server. Some communities prefer to have a special bot role (for example, Bot City Gang) for a group of bots without the role that usually comes with a bot, so we keep that option available.
Permissions
The list below details the minimum needed permissions in order for Gaius to function without moderation:
- View Channels
- Send Messages
- Embed Links
- Attach Files
The staff permissions needed for Gaius are listed below:
- Manage Channels --- (for Tickets module, Panic, (Un)Lock, etc.)
- Manage Roles --- (for Mutes module, Roles module, Commands module)
- Manage Server --- (for smartprune features)
- Change Nickname --- (for nick command)
- Manage Nicknames --- (for name filtering and nick command)
- Kick Members --- (for anti-raid, auto-moderation, and kicks module)
- Ban Members --- (for anti-raid, auto-moderation, and bans modules)
- Add Reactions --- (for reaction-based roles system)
- Use External Emoji --- (optional for Commands Module)
- Manage Messages --- (for auto-moderation, wordlist and imaging filtering, ct [channel type] command)
- Connect --- (for Voice Moderation commands)
- Use Voice Activity --- (for Voice Moderation commands)
- Mute Members --- (for vcmute and vcunmute commands)
- Administrator --- (THIS IS ONLY NEEDED FOR THE FREEZE COMMAND AND NOTHING ELSE!)
If a role is assigned to Gaius, it is very important that its highest role with the Manage Roles perm is higher than the moderator role(s) and below your admin role(s).
Prefix
The first fundamental key part of every bot is the bot's prefix. Gaius' prefix is used for every command, so it's super important to ensure that Gaius has a prefix that can be easily used.
Make sure that Gaius' prefix is unique from the other bots to prevent more than one bot responding to one command.
Required Permissions (Staff)
Manage Server (Admin)
Syntax
!prefix newPrefixHere
Examples
!prefix !! | Changes Gaius' default prefix to !!
!!prefix prefix ! | This is a common mistake...the example below shows how to fix this.
prefix !prefix ! | Changes the above's prefix to !
!resetmyprefix | Reset's Gaius' prefix to ! as the default prefix regardless of setting
WARNING
Kicking/Banning any Gaius bot then bringing it back will NOT reset the prefix or any settings.
If you forgot your prefix or don't know what you have changed it to, then the !checkprefix command (by saying !checkprefix) will always respond with the current prefix as long as Gaius has the permissions to see and speak in the same channel as the command.
If you get a weird prefix, for example: prefix !, and want to change it to !, then do, in the same example as before, prefix !prefix !.
If you're still having trouble, !resetmyprefix will reset Gaius' prefix to the default prefix.
Modules
Gaius is separated into several modules and all modules are disabled by default, which means that in order to begin configuring a verification system or any other feature, enabling the modules is the first step of the actual configuration process with commands. This is intended so that the only features you need are enabled, and the rest remain disabled. The listed order of the modules below is in a top-down fashion that is commonly configured first from the core of the basics to the extra layered security and utilities.
Make sure that all modules you are want to enable for your server are enabled before proceeding onto the commands in the following pages.
Required Permissions (Staff)
Manage Server (Admin)
Syntax
!module moduleName
Examples
!help module | Displays the embedded help message for module
!module list | Lists all of Gaius' available features and says whether each module is enabled or disabled
!module bans | Enables/Disables the bans module
List of Available Modules
Help Command
Whenever quick help or information is needed for a command, using the help command is the most efficient action. It will respond with an embedded interactive help message, which you can navigate by saying any of the listed available options.
Required Permissions (Staff)
None (Everyone)
Syntax
!help | Displays the embedded interactive help message
The help message expires after a certain amount of time. If it no longer responds, it has simply expired and the help command has to be sent again.
All commands that are tied to a module will be in the respectively named module in the help message. All other commands that are always enabled are in the "Other" section.
FAQ
Q. Will kicking Gaius reset the bot?
- No, kicking/banning Gaius will never reset your settings or prefix. If you're having trouble with the prefix and want to reset it to the original prefix, !resetmyprefix will reset the prefix.
Q. Why aren't my commands aren't working? Is the bot offline?
- This could be for a number of reasons. Here are a list of solutions (beginning with some of the most common solutions):
- Say
!checkprefixin your server. If Gaius has permission to speak in and see the channel, it will always respond with the current prefix.- If there is no response, try to @Gaius...this will pop up taggable users in a list, along as their online status icon on the lower-left of the user avatar. In the unlikely event that it is a gray icon, then Gaius is offline in your server and should be back online within a few minutes.
- If Gaius is online, make sure Gaius has permission to speak in the channel (Server Settings > Roles and/or Edit Channel > Permissions).
- If Gaius is not listed when you try to @gaius, then it likely does not have permission to see the channel, which is either because it does not have a role to see the channel(s), or it cannot see the channel in your channel settings.
- If Gaius responds with its current prefix, check your enabled modules with the
module listcommand. Most commands are tied with a module, which means if, for example, the mutes module is not enabled, thenmute,unnmute, andswitchmwill also be disabled.
- If this does not solve your issue, then the next step is to contact support.
Q. How do I see all the commands?
- The help command is man's best friend (not dogs).
Q. Is there a Dashboard? If so, how do I get to the Dashboard?
-The Dashboard is currently NOT for configuration and can be found at dash.gaiusbot.me. Currently, is only supports premium purchases and leaderboard functionality.
Q. Is there a premium (paid) version of Gaius? If so, where can I find more details about it?
- All details, including subscription information for Gaius Cicereius+ can be found here.
Video
Not yet available
If you have or find a video on Gaius specifically for what is covered in this documentation page, you can send the info to Fairy 狐 紫#0001 via DM (You must be in the support server in order to make contact).
Points of Interest
Gaius Configuration
Staff Handbook
Bot Logging/Exlog
Verification Module
Anti-Spam Protection
Wordlist Filtering
This is the First Page | Next page
Configuring Gaius
All configuration/setting commands require a role with either the Administrator or Manage Server permission or a role added as admin in the staff list.
Prefix
The first fundamental key part of every bot is the bot's prefix. Gaius' prefix is used for every command, so it's super important to ensure that Gaius has a prefix that can be easily used.
Make sure that Gaius' prefix is unique from the other bots to prevent more than one bot responding to one command.
Required Permissions (Staff)
Manage Server (Admin)
Syntax
!prefix newPrefixHere
Examples
!prefix !! | Changes Gaius' default prefix to !!
!!prefix prefix ! | This is a common mistake...the example below shows how to fix this.
prefix !prefix ! | Changes the above's prefix to !
!resetmyprefix | Reset's Gaius' prefix to ! as the default prefix regardless of setting
WARNING
Kicking/Banning any Gaius bot then bringing it back will NOT reset the prefix or any settings.
If you forgot your prefix or don't know what you have changed it to, then the !checkprefix command (by saying !checkprefix) will always respond with the current prefix as long as Gaius has the permissions to see and speak in the same channel as the command.
If you get a weird prefix, for example: prefix !, and want to change it to !, then do, in the same example as before, prefix !prefix !.
If you're still having trouble, !resetmyprefix will reset Gaius' prefix to the default prefix.
Auto Delete
Autodel will automatically delete command messages when they are sent. This is turned on by default. You can turn this off by either saying autodel 0 or autodel off.
The number provided in the command is in seconds.
Required Permissions (Staff)
Manage Server (Admin)
Syntax
!autodel #/off/0/current
Examples
!autodel 5 | Deletes command messages 5 seconds after they have been sent
!autodel off | Does not delete command messages after they have been sent
!autodel current | Displays the current autodel setting.
Staff Role Assigning
This is also a section that you will likely only have to once. Setting staff roles allows Gaius to know who can use certain parts of the moderation commands needed to help them do their part in keeping your server and members safe from harm's way.
Admin is considered almighty with Gaius. They can freely and completely configure the bot and are exempt from all auto-moderation, filtering, and punishments. It's highly recommended to give the "Admin" only to those who will ever have a need to configure the bot freely (i.e. owner, bot tech, co-owner).
Mod is the chat police for guilds. Mods cannot configure the bot, but can use a range of commands to moderate servers, including kick, mute, and voice moderation commands. Mods are also automatically exempt from auto-moderation except when configured to not be exempt.
Helper is like a trial mod, they have instant access to the !warn command only and are exempt from auto-moderation except when configured to not be exempt.
This is a super important part of the setup because this determines who can use certain mod commands to help keep your community safe and sound.
Required Permissions (Staff)
Manage Server (Admin)
Syntax
!staff admin/mod/helper add/rem role
Examples
!staff list | Displays the current list of staff roles that have been set for the server
!staff helper add 123456789012 | Adds the role as helper in the staff list
!staff mod rem @Troll | Removes the role Troll from mod in the staff list
!staff admin add @Owner | Adds the role Owner as admin in the staff list
Permission Overrides
Permission tuning can be used to allow mods to ban people, perform panic functions, or lock a channel during emergencies. It can also block someone from using a command that they already have access to, restrict a command to only be used by certain people, roles, or in specific channels, or free the command from any permission tuning that are already set for it.
The commands are allow, block, restrict, and free, all of which have specific functions in making sure that certain commands and modules can be accessed or not be accessed by certain conditions.
The 3 tuning commands accepts many types of input for your needs:
• Server
• Role/Role Name/ID
• Member Mention/ID
• Channel Mention/ID
If you are ever unsure about or want to ensure that you have permission overrides for a command or module, you can say the command below:
• !listperms command
Required Permissions (Staff)
Manage Server (Admin)
Syntax
!allow/block/restrict command member/role/channel
!free command
!listperms command
Examples
!allow ban @Moderator | Allows the Moderator role to use the ban command
!block ban Moderator | Takes away the Moderator role's ability to use the ban command
!restrict ban @Moderator | Only allows the Moderator role to use the ban command
!free ban #staff | Removes all permission overrides that were set to the ban command
!listperms bans | Displays the list of permission overrides for the bans module
Bypass
Bypass allows specific channels or roles to have a pass from being subjected to specific automoderation features. One common use is to reward people with a filter bypass or two after they reach a certain level with a leveling bot, such as slowmode, URL, images, or stickers. Some bypasses can be used for long-time regular users, or helpers with specific bypasses needed from automoderation.
The examples below will specify a code in [brackets] that indicate putting the code in is optional, but be warned that not providing a [code] will default to all codes turning ON or OFF. THE BRACKETS ARE NOT INCLUDED IN THE ACTUAL COMMAND.
Add, rem, or toggle can be used...if not specified, then it will 'toggle' which will switch the code ON or OFF.
If the [code] is blank, then it will default to 'all', which toggles all codes ON or OFF (only OFF when all codes are ON).
Required Permissions (Staff)
Manage Server (Admin)
Syntax
!bypass add/rem/toggle [code]/all Role
!bypass add/rem/toggle [code]/all Channel
!bypass list
Examples
!bypass add invite @Member | Allows the Member role to send server invites
!bypass rem invite @Member | Removes the Member role's ability to use send server invites
!bypass toggle invite #general-chat | Toggles the allowance of server invites to be sent in the channel
!bypass #general-chat | Toggles all filters either on or off for the #general-chat channel
!bypass list | Displays the list of bypasses in the server
Bypass Codes List
- Filter
- BlockedTags
- Invite
- URL
- Spam
- Duplicate
- Mention
- Emoji
- Newline
- Stickers
- Image
- Slowmode
- Activity
Alias/Unalias
Let's say you want to have staff use the mute command but want !b to work, too. Alias allows for the ban command to also be !b, triggering the ban command. You can also make the command to only work with the alias that has been set. Alias list will give you a list of all aliases set for the command, which takes away the guess work.
Another helpful command is unalias, which removes the alias that has been set for the target command. Want to remove a forced alias, but keep the same alias without needing to do the alias command again? No problem!
Setting an alias using alias force command, you are telling Gaius that you only want the set alias(es) to be the command that gives the action. For example, if you have an alias for ban set to b, then !b or !ban will be used for the ban command; if you say !alias force ban afterwards, then only !b will work for the ban command.
Required Permissions (Staff)
Manage Server (Admin)
Syntax
!alias command NewName
!alias force command
!alias list command
!unalias command alias
!unalias force command
Examples
!alias ban bean | Sets bean to be an alias for the ban command
!alias force ban | Sets the alias(es) as the only option(s) to use the ban command
!alias list ban | Displays the currently set alias(es) that are set for the ban command
!unalias ban | Removes all aliases that have been set for the ban command
!unalias ban bean | Removes the alias "bean" from the ban command
!unalias force ban | Removes the force option from the ban command if the force option is turned on
FAQ
Q. Will kicking Gaius reset the bot?
- No, kicking/banning Gaius will never reset your settings or prefix. If you're having trouble with the prefix and want to reset it to the original prefix, !resetmyprefix will reset the prefix.
Q. Why aren't my commands aren't working? Is the bot offline?
- This could be for a number of reasons. Here are a list of solutions (beginning with some of the most common solutions):
- Say
!checkprefixin your server. If Gaius has permission to speak in and see the channel, it will always respond with the current prefix.- If there is no response, try to @Gaius...this will pop up taggable users in a list, along as their online status icon on the lower-left of the user avatar. In the unlikely event that it is a gray icon, then Gaius is offline in your server and should be back online within a few minutes.
- If Gaius is online, make sure Gaius has permission to speak in the channel (Server Settings > Roles and/or Edit Channel > Permissions).
- If Gaius is not listed when you try to @gaius, then it likely does not have permission to see the channel, which is either because it does not have a role to see the channel(s), or it cannot see the channel in your channel settings.
- If Gaius responds with its current prefix, check your enabled modules with the
module listcommand. Most commands are tied with a module, which means if, for example, the mutes module is not enabled, thenmute,unnmute, andswitchmwill also be disabled.
- If this does not solve your issue, then the next step is to contact support.
Q. How do I see all the commands?
- The help command is man's best friend (not dogs).
Q. Is there a Dashboard? If so, how do I get to the Dashboard?
-The Dashboard is currently NOT for configuration and can be found at dash.gaiusbot.me. Currently, is only supports premium purchases and leaderboard functionality.
Q. Is there a premium (paid) version of Gaius? If so, where can I find more details about it?
- All details, including subscription information for Gaius Cicereius+ can be found here.
Video
Not yet available
If you have or find a video on Gaius specifically for what is covered in this documentation page, you can send the info to Fairy 狐 紫#0001 via DM (You must be in the support server in order to make contact).
Points of Interest
Staff Handbook
Bot Logging/Exlog
Verification Module
Anti-Spam Protection
Wordlist Filtering
Modules
Warns
Make sure that your warns module is enabled before configuring the warns module (!module warns to enable, and !module list to see if it's enabled).
The roles set as helper or mod🔗 are able to warn other people.
Setting Up Warns Module
The command used for setting up the warns module is pwarnings, which has a set of other subcommands. The warns module is integrated with the mutes, kicks, and bans modules when set up to automatically apply a punishment whenever someone reaches a certain amount of warnings. It's also possible to have warnings to be automatically purged from the system or pardoned from the user after the warning is at a certain age.
Permissions
The list below details the minimum needed permissions in order for the warns module to function:
- View Channels
- Send Messages
- Manage Roles (if you want to auto-mute people with enough warnings)
- Kick Members (if you want to auto-kick people with enough warnings)
- Ban Members (if you want to auto-ban people with enough warnings)
Pwarnings
This is the command that is used to change the settings for the warnings module. There are many subcommands to it, each with their own unique purpose.
Required Permissions (Staff)
(Admin)
Syntax
!pwarnings list
!pwarnings mutemulti number
!pwarnings allowstaff [on/off/true/false]
!pwarnings autopardon/autopurge off/number
!pwarnings WarnCount# [off/ban/kick/mute] [# (minutes for mutes...days for bans)]
Examples
!pwarnings list | Displays your current warning module settings
!pwarnings mutemulti 3 | Sets the multiplied amount of time the next auto-mute to be greater than the previous
!pwarnings allowstaff on | Allows staff to mute each other (They are still exempt from punishment)
!pwarnings autopardon/autopurge 14 | Sets an automatic purge or pardon after the warn is 14 days old
!pwarnings 3 mute 15 | Automatically mutes a person for 15 minutes when they get 3 warnings
!pwarnings 5 kick | Automatically kicks a person when they get 5 warnings.
For mutemulti:
If you set the first mute punish to be at 30 minutes, the first mute punishment will mute someone for 30 minutes.
If you set a mute punishment in your pwarnings list without a number, then it will permanently mute someone.
If you set the mutemulti to 15, then the warned person will be muted for 15 minutes on the first mute punishment, 30 minutes on the second mute punishment, 45 minutes for the third mute punishment, and so on.
Staff Commands
These are a list of commands that staff can use at their disposal. Staff roles set to helper or mod have access to these commands besides purgewarn, which is a command that wipes the warning from the system's records.
The warnID can be found by doing the warnlist command. For visual reference, check the question in the FAQ at the bottom of the page.
Warn
This is used to warn those pesky people....or to have fun warning staff since staff cannot be auto-punished by warnings.
Required Permissions (Staff)
(Helper)
Syntax
,warn member [Optional Reason]
Examples
!warn @yeetmaster#3000 | Warns a person, sends the warning in their DM, and sends a warn log (if enabled)
Bulkwarn
A new feature that allows multiple people to be warned in the same command. This is great for when you don't want to send many messages when warning a group of people.
The syntax is super important to follow because Gaius will not add a warning to any line that is not following the syntax rules.
Required Permissions (Staff)
(Helper)
Syntax
!bulkwarn WarnedUserID % Moderator % Reason
Warned User % Moderator % Reason
Warned User % Moderator % Reason
Examples
!bulkwarn 507121360831234530 % 507121360833609730 % trolling
507121360812349730 % 507121360833609730 % trolling
512341360833609730 % 507121360833609730 % trolling
507121360123609730 % 507121360833609730 % trolling | Warns group, sends warning in DM, sends warn log (if enabled)
If there is no reason for the warning, include the second % but simply leave it blank.
Example:
!bulkwarn 507121360831234530 % 507121360833609730 %
507121360812349730 % 507121360833609730 % trolling
512341360833609730 % 507121360833609730 %
Warnings that are improperly filled out will be skipped. A new line (which can be made with Shift+Enter) is required for each new warning. Any reason with a line break inside it will have the reason cut off.
Rewarn
If you ever warned someone for the wrong reason or no reason or maybe accidentally pressed Enter in the middle of typing, the rewarn command will save you from having to get a mod to pardon or purge the warn by providing a second chance to re-type the warn reason. Be sure to have your warn ID handy.
Required Permissions (Staff)
(Helper)
Syntax
!rewarn warnID This is the new reason
!reward member
Examples
!rewarn 638 Did not share popcorn during movie night.
!rewarn yeemasteer#3000 | Sends a prompt with a current list of warnings you can choose from that the user has
Forcewarn
If you've ever needed to warn someone for something but feel as if the behavior does not warrant a punishment or a weighted decision in a punishment, forcewarn would be ideal over using the warn command. Forcewarn applies the warning to the user and the record, however it will not notify the offender and it will not apply any punishments. Another helpful use case for this command is for when someone breaks the rules and then leaves to try to avoid getting punished or a record being added to them.
This command will NOT apply punishments or notifications, however it will still generate a warns log.
Required Permissions (Staff)
(Helper)
Syntax
!forcewarn member [Reason]
Examples
!forcewarn 123456789012345678 Did not share popcorn during movie night.
Pardon
You can pardon a warn from a person who was not supposed to be warned, or maybe they humbly apologized for their behavior. Pardons are like a forgiveness...but along the lines of "I forgive, but I don't forget," because pardon drops the active strike from their active warn counts that are tracked for auto-punishment and results in the display of the pardoned warns in strikethrough text. This is a moderator command.
Required Permissions (Staff)
(Mod)
Syntax
!pardon WarnID
!pardon member
Examples
!pardon 638 | Pardons Warn #638
!pardon yeemasteer#3000 | Sends a prompt with a current list of warnings you can choose from that the user has
This command is reserved for mods instead of being accessed by helpers because a mod should be the one to decide if a warning a helper made was pardonable, and this prevents one helper from pardoning every warning that another helper sends out.
Purgewarn
Good warn? Bad warn? No problem! Purgewarn is here to wipe it and sweep the warning from the system. Any warning that is purged or auto-purged will be permanently removed from the system and will not be displayed in the warnlist. This is a moderator command.
Required Permissions (Staff)
(Mod)
Syntax
!purgewarn all member
!purgewarn member
!purge warnID
Examples
!purgewarn all yeetmaster#3000 | Purges all warnings from yeetmaster#3000
!purgewarn yeetmaster#3000 | Sends a prompt with a current list of warnings you can choose from that the user has
!purgewarn 324 12 125 | Purges warnings # 324, 12, and 125
This command is reserved for mods instead of being accessed by helpers because a mod should be the one to decide if a warning a helper made should be purged, and this prevents one helper from purging every warning that another helper sends out.
Purging a warning removes it permanently from the system and cannot be taken back. Only purge warnings that you are absolutely sure you never will have to look at again or will never bee important enough to keep.
Warnlist
Warnlist provides you with a customizable generated list of warnings along with each of their respective target, mod, reason, and warn ID. You can get a list of all warnings that a staff member has made, all warnings a person has received, or search through warnings by reason. For example, if you want to see all warnings for racial slurs, you can do so by searching for the word racism or racial.
Required Permissions (Staff)
(Mod)
Syntax
!warnlist all
!warnlist mod member
!warnlist id warnID
!warnlist reason This is a part of or the whole reason
!warnlist member
Examples
!warnlist all | Lists every single warning that is currently in the system
!warnlist mod @DabbingOnHaters#3000 | Lists all warnings that DabbingOnHaters#3000 has sent
!warnlist ID 638 | Displays warning number 638
!warnlist reason popcorn | Lists all warnings with the word popcorn in the reason
!warnlist @yeetmaster#3000 | Lists all the warns yeetmasteer#3000 has
Extremely useful utility and resource for record keeping, auditing, and moderating your server and staff team.
This command is reserved for mods instead of being accessed by helpers because a mod should be the one to decide if a warning a helper made should be purged, and this prevents one helper from purging every warning that another helper sends out.
FAQ
Q. Will kicking Gaius reset the bot?
- No, kicking/banning Gaius will never reset your settings or prefix.
Q. What are Warn IDs?
- Every warn has a special ID that can be used for the purgewarn and pardon command. The WarnID in the example photo below is 3. Using this example, you would say !purgewarn 3 or !pardon 3 to pardon or purge the warn.
Q. What are pardoned warns?
- Warns that are pardoned will show up in !warnlist as strikethrough text. This means it will not count towards auto punishments but will remain on the record until it is either purged or auto-purged.
Q. How do I see all the commands?
- The help command is man's best friend (not dogs).
Video
Not yet available
If you have or find a video on Gaius specifically for what is covered in this documentation page, you can send the info to Fairy 狐 紫#0001 via DM (You must be in the support server in order to make contact).
Points of Interest
Staff Handbook
Bot Logging/Exlog
Verification Module
Anti-Spam Protection
Wordlist Filtering
Mutes
Make sure that your mutes module is enabled before configuring the mutes module (!module mutes to enable, and !module list to see if it's enabled).
The roles set as mod🔗 are able to mute other people.
Setting Up Mutes Module
The command used for setting up the mutes module is mutetype, which displays a prompt for you to either say “role” or “clean” depending on what mute type you would like. “Role” mutetype is simply adding the role onto the offending person “Clean” mutetype clears all roles from the offending person and gives them the mute role in return. Once a person is unmuted after being muted through the “clean” mutetype, they will receive all the roles that were removed from them.
Permissions
The list below details the minimum needed permissions in order for the mutes module to function:
- View Channels
- Send Messages
- Manage Roles
Staff Commands
Make sure that Gaius' role is higher than your mod role(s) but below your admin role
The role(s) set as mod🔗 are able to mute other people.
Mutetype
When you run this command, you'll be given 2 mute type choices: role and clean Simply reply in the chat with the name of the mute type you want.
Required Permissions (Staff)
Manage Roles (Mod)
Syntax
!mutetype
|
Type |
Description |
| Role | Adds the mute role to the member. |
| Clean | The same as role except for the bot first removes all roles associated with the member. Upon unmute, the member will receive all their roles back. |
Mute/Unmute
This command is reserved for mods. If you would like for your helpers in your staff list to use the mute and unmute commands, then allowing them through the allow command🔗 will get you what you need.
Required Permissions (Staff)
Manage Roles (Mod)
Syntax
!mute member [#w #d #h #m #s] [reason]
!unmute member
Examples
!mute @yeetmaster#3000 420d | Mutes the person, sends the mute in their DM, and sends a mute log (if enabled)
!unmute @yeetmaster#3000 | Unmutes the person
If the mute role was added, or member roles were cleaned then the mute role added, and the bot works as intended, but the muted person can still speak in channels, then there is a configuration error in your channel or role permissions.
If you are using the "role" mutetype and the above situation is happening, the easiest possible fix would be to swap to the "clean" mutetype.
By default mutes are in minutes. Saying !mute @user 6 will mute them for 6 minutes.
Mutelist
This command is reserved for mods. If you would like for your helpers in your staff list to use the mute and unmute commands, then allowing them through the allow command🔗 will get you what you need.
Required Permissions (Staff)
Manage Roles (Mod)
Syntax
!mutelist
Examples
!mutelist | Lists all the currently active mutes
FAQ
Q. Will kicking Gaius reset the bot?
- No, kicking/banning Gaius will never reset your settings or prefix.
Q. Gaius doesn't say anything or mute people when I try to mute. What's going on?
- Very likely the mutes module is disabled. You can see if it's enabled by saying !module list. If it shows the module is disabled, you can enable it with !module mutes, and then follow the setup process.
Q. What if I mute someone for a different time than they already had?
- The new mute timer will overwrite, meaning they will be muted for the time given on the second mute instead of the first mute
Q. What mute type should I use?
- That depends. Some servers have many roles with many more channel override permissions that would make the act of only giving the mute role inefficient…meaning that the supposedly muted user can still interact in other channels. A clean mute type is ideal in this situation to avoid any discrepancies in permissions and ensure the muted person really is muted.
Q. I muted someone but they can still speak? Is this a bug?
- No. If the mute role was added, or member roles were cleaned then the mute role added, then the bot works as intended. However, if the muted person can still speak in channels, then there is a configuration error in your channel or role permissions. This can be fixed by checking your channel and role perms to make sure that there are not unwanted discrepancies in permissions within your community.
- If you are using the "role" mutetype and the above situation is happening, the easiest possible fix would be to swap to the "clean" mutetype.
Q. How do I see all the commands?
- The help command is man's best friend (not dogs).
Video
Not yet available
If you have or find a video on Gaius specifically for what is covered in this documentation page, you can send the info to Fairy 狐 紫#0001 via DM (You must be in the support server in order to make contact).
Points of Interest
Staff Handbook
Bot Logging/Exlog
Verification Module
Anti-Spam Protection
Wordlist Filtering
Kicks
Make sure that your kicks module is enabled before configuring the mutes module (!module kicks to enable, and !module list to see if it's enabled).
The roles set as mod🔗 are able to kick other people.
Setting Up Kicks Module
This is one of the most easiest features to set up because enabling the module means the feature has been set up. There are no configuration commands for this module. Its sole purpose is simply to kick rowdy people, raiders, or even spam accounts from your community.
Permissions
The list below details the minimum needed permissions in order for the kicks module to function:
- View Channels
- Send Messages
- Kick Members
Staff Commands
Make sure that Gaius' role is higher than your mod role(s) but below your admin role
Kick
It is possible to kick people by their role, This will result in the irrevocable kicking of everyone who has this role. This cannot be canceled because a processed command cannot be canceled.
Required Permissions (Staff)
Kick Members (Admin)
Syntax
!kick member [Reason]
!kick member member member [Reason]
!kick role role [Reason]
Examples
!kick @yeetmaster#3000 Not sharing popcorn during movie night | Kicks person, sends kick DM, and sends kick log (if enabled)
!kick @yeetmaster#3000 @yeetmaster#3001 | Kicks multiple people, sends kick DMs, and sends kick log (if enabled)
!kick @Troll Role | Kicks everyone who has the Troll Role role, sends kick DMs, and sends kick log (if enabled)
Softban
It is possible to softban people by their role, This will result in the irrevocable softbanning of everyone who has this role. This cannot be canceled because a processed command cannot be canceled.
This is in the kicks module because it acts like a hard kick, or a soft ban. Gaius bans the person, so that all their messages in the last 24 hours are automatically purged, and unbans them. This is preferable over a ban or a kick in cases where a person is being a toxic troll but you don't think what they have done is necessarily ban-worthy and should not be in the server at the time.
Required Permissions (Staff)
Ban Members (Admin)
Syntax
!softban member [Reason]
!softban member member member [Reason]
!softban role role [Reason]
Examples
!softban @yeetmaster#3000 Not sharing popcorn on movie night | Softbans person, sends DM, and sends kick log (if enabled)
!softban @yeetmaster#3000 @yeetmaster#3001 | Softbans multiple people, sends DMs, and sends kick logs (if enabled)
!softban @Troll Role | Softbans everyone who has the Troll Role role, sends DMs, and sends kick logs (if enabled)
FAQ
Q. Will kicking Gaius reset the bot?
- No, kicking/banning Gaius will never reset your settings or prefix.
Q. How do I see all the commands?
- The help command is man's best friend (not dogs).
Video
Not yet available
If you have or find a video on Gaius specifically for what is covered in this documentation page, you can send the info to Fairy 狐 紫#0001 via DM (You must be in the support server in order to make contact).
Points of Interest
Staff Handbook
Bot Logging/Exlog
Verification Module
Anti-Spam Protection
Wordlist Filtering
Bans
Make sure that your bans module is enabled before configuring the bans module (!module bans to enable, and !module list to see if it's enabled).
Setting Up Bans Module
This is one of the most easiest features to set up because enabling the module means the feature has been set up. There are no configuration commands for this module. Its sole purpose is simply to ban rowdy people, raiders, or even spam accounts from your community.
Permissions
The list below details the minimum needed permissions in order for the bans module to function:
- View Channels
- Send Messages
-
Manage Messages (If using
%das an argument at the end of the ban command) - Ban Members
Staff Commands
Make sure that Gaius' role is higher than your mod role(s) but below your admin role
Ban/Unban
If you would like your mods to use the ban command, you can do so by doing !allow ban @Mod Role.🔗
It is possible to ban people by their role with the banrole command. This will result in the uninterruptable banning of everyone who has this role. This cannot be canceled because a processed command cannot be canceled.
Required Permissions (Staff)
Manage Messages
Ban Members (Admin)
Syntax
!ban member [#w #d #h #m #s] [%d0-7] [Reason]
!ban member member member [%d0-7] [Reason]
!ban role role [%d0-7] [Reason]
!unban user [Reason]
!unban user user user [Reason]
Examples
!ban @yeetmaster#3000 420s %d2 | Bans person, sends ban DM, deletes 2 days of their messages and sends ban log
!ban @yeetmaster#3000 @yeetmaster#3001 | Bans multiple people, sends ban DMs, and sends ban log
!banrole @Troll Role | Bans everyone who has the Troll Role role, sends ban DMs, and sends ban log
!unban @yeetmaster#3000 420s %d2 | Unbans person and sends a log in the ban log
!unban @yeetmaster#3000 @yeetmaster#3001 | Unbans multiple people and sends logs in the ban log
Banmsg
This is for permanently banned users, not users who were softbanned. Softban is in the kicks module because it doubles as a hard kick.
This is highly useful for servers that allow banned people to submit ban appeals.
Banmsg allows banned members the opportunity to see your community's customized ban message. Whether it's to allow a ban appeal opportunity, tell them to get yeeted on, or say who banned them, where, and why, banmsg makes these possibilities possible.
Required Permissions (Staff)
(Admin)
Syntax
!banmsg [temp] message
!banmsg reqreason [off/on/true/false]
!banmsg requnreason [off/on/true/false]
Examples
!banmsg Get yeeted on, %user! :Dabalicious: | Sets the new ban message to be sent to banned people
!banmsg temp You're temporarily banned. | Sets the new ban message to be sent to temp-banned people
!banmsg reqreason on | Sets the requirement to say the reason in all bans, kicks, mutes, and vcmutes
!banmsg requnreason on | Sets the requirement to say the reason in all unbans, unmutes, and vcunmutes
Banmsg Flags
These flags are useful tools available to you and will be replaced by whatever that flag is meant for (example: %server will be replaced by the name of your server). In the example, any time you change your server's name after the setup, the flag will also change to that server's current name.
| Flag | Description |
| %server | Will be replaced with the server's name |
| %user | Will be replaced with the banned user's name |
| %reason | Will be replaced with the reason provided by the moderator |
| %mod |
Will be replaced with the name of the moderator who performed the ban |
Allbans/Tempbanlist
As the command name suggests, these commands allows you to see the list of permanently and temporarily banned users respectively...very easy to use and quite useful for auditing and reviewing purposes.
Required Permissions (Staff)
(Admin)
Syntax
!allbans [noreason] [nodelete]
!tempbanlist
Examples
!allbans noreason | Lists all permanent bans that don't have a reason along with other details of each ban
!allbans nodelete | Lists all permanent bans of account that have not been deleted from Discord
!tempbanlist | Lists all temporary bans (softbans) that are currently active in the server
BanSync
REQUIRED PERMISSIONS:
Ban Members
BanSync is NOT a part of the band module, so there is NOT a need to enable the band module.
This feature is reserved for Gaius Plus only. Learn more.
BanSync with a server will result in both bans and unbans linking between the servers.
Setup
| Command | Descriptive Example |
| !bansync current |
!bansync current
- Displays the current BanSync settings |
| !bansync add/rem [export/import] id |
!bansync add/rem export 270438133584232449
- Adds/removes the target server to/from the exporting list This will tell Gaius to export, or send, all future bans to the target server that has been specified. Be aware not to use the same server ID that you are doing the command in. It must be the target server that you want to send the bans to. !bansync add/rem import 270438133584232449
- Adds/removes the target server to/from the importing list This will tell Gaius to import, or receive or get, all future bans from the target server that has been specified. Be aware not to use the same server ID that you are doing the command in. It must be the target server that you want to receive the bans from. |
| !bansync approve/unapprove id |
!bansync approve 270438133584232449
- Approves the target server for BanSync !bansync unapprove 270438133584232449
- Unapproves, or removes, the target server for BanSync |
| !bansync clear |
!bansync clear
- Removes all bansync connections with all servers This will still keep the bansync setting to remain enabled instead of disabled. Only the listed servers in the current bansync sommands are removed from the list. |
| !bansync enable/disable |
!bansync enable
- Enables BanSync integration with other servers !bansync disable
- Disables BanSync integration with other servers |
| !bansync recursive id |
!bansync recursive 270438133584232449
- Adds all previous bans from the specified ServerID to your own |
FAQ
Q. Will kicking Gaius reset the bot?
- No, kicking/banning Gaius will never reset your settings or prefix.
Q. Can I set the bans to not send a message to someone when they are banned?
- No, this is currently not a feature.
Q. How do I see all the commands?
- The help command is man's best friend (not dogs).
Video
Not yet available
If you have or find a video on Gaius specifically for what is covered in this documentation page, you can send the info to Fairy 狐 紫#0001 via DM (You must be in the support server in order to make contact).
Points of Interest
Staff Handbook
Bot Logging/Exlog
Verification Module
Anti-Spam Protection
Wordlist Filtering
Verify
Make sure that your verify module is enabled before configuring the verify module (!module verify to enable, and !module list to see if it's enabled).
Setting Up Verify Module
The command used for setting up the verify module is verification, which has a set of other subcommands that allows you to edit the module's current settings without the need to re-run the entire process again. Verification is also possible through DMs, a server channel, or a captcha (which is done in the person's DMs and is a Premium feature).
Permissions
The list below details the minimum needed permissions in order for the verify module to function:
- View Channels
- Send Messages
- Embed Links
- Manage Messages
- Manage Roles
- Kick Members (If autokick is enabled)
Verification
There are many subcommands to the verification module, each with their own unique purpose. This section will have a lot of information to process, so please re-read this as many times as it takes in order to set your verification to the best fit for your community. Instead of the conventional format as seen in the previous pages, this section will have a specialized list for the subcommands and what to understand about each of them.
!setverify is no longer the setup command; it has changed to !verification. !verification cannot be ran by itself to start the setup process as was possible with the Legacy version of Gaius. A subcommand must be used to with the command in order to change the module's properties. This is done so that you won't have to go through the whole setup process each time something happens or changes after the first setup.
Required Permissions (Staff)
- Embed Links
- Manage Messages
- Manage Roles
- Kick Members (Admin)
Syntax
!verification subcommand [input or arguments to set]
Examples
Instead of the conventional example list and because there are many subcommands for the verification command, a detailed table for all the subcommands and their applicable inputs are listed below.
| Subcommand | Descriptive Example |
|
current |
!verification current- Displays all current settings in the verify module |
| type |
- What do you want Gaius to do with the verify role?
The overall configuration of your community's channel and role permissions will greatly determine which type of verification works best for your community and keep unverified people out of the social spaces. |
| role |
- Sets which role(s) to add or remove from a verified person |
| dm/captcha |
You must say either 'on' or 'off' when using this subcommand. What is captcha? |
| message |
One helpful tip is to provide the verification command somewhere in the message to help the next user understand what the verification command is. |
| dmmessage |
!verification dmmessage This is a DM message about verification.- IF verification is set to DM, instead of channel, then this message will be sent to the person's DM for verification. |
| autokick |
!verification autokick number/off- How many minutes you would like to wait until Gaius automatically kicks the new person if they did not pass verification. - Saying OFF, instead of a number, will turn this feature off. |
| channel |
!verification channel #channel- Sets what channel the verification process will take place for newcomers |
| command |
!verification command command- Sets the command a person must use in order to be verified. The command MUST include the prefix. |
Testverify
After you set up verification, the most important step with any security configuration is to test it and make sure everything is working as intended. Testverify will help provide a streamlined troubleshooter and reliable debugging tool to help ensure the best fit verification system for your community.
Required Permissions (Staff)
- Embed Links
- Manage Messages
- Manage Roles
Syntax
!testverify member
Examples
!testverify @yeetmaster#3000 | Begins the testing of the current verification setup
Manualverify
Required Permissions (Staff)
- Embed Links
- Manage Messages
- Manage Roles
Syntax
!manualverify member
Examples
!manualverify @yeetmaster#3000 | Manually verifies the person
FAQ
Q. Will kicking Gaius reset the bot?
- No, kicking/banning Gaius will never reset your settings or prefix.
Q. My roles aren't being assigned! Is the bot broken?
- If a role is not being assigned when verification is attempted, check the following:
-
- Gaius' role has Manage Roles permission
- Gaius' role is above the role(s) you're trying to (un)assign
- Gaius is able to read/send messages in the verification channel (unless you're using DM verify)
- If DM verify is enabled, users are able to receive DMs
Q. How can I verify someone manually?
- The manualverify command is handy for situations that verify isn't working as intended for a newcomer.
Q. How do I see all the commands?
- The help command is man's best friend (not dogs).
Video
Not yet available
If you have or find a video on Gaius specifically for what is covered in this documentation page, you can send the info to Fairy 狐 紫#0001 via DM (You must be in the support server in order to make contact).
Points of Interest
Staff Handbook
Bot Logging/Exlog
Verification Module
Anti-Spam Protection
Wordlist Filtering
Welcome
Make sure that your welcome module is enabled before configuring the welcome module (!module welcome to enable, and !module list to see if it's enabled).
Setting Up Welcome Module
The command used for setting up the welcome module is welcome, which has a set of other subcommands that allows you to edit the module's current settings without the need to remember several commands.
The list below details the minimum needed permissions in order for the welcome module to function:
- View Channels
- Send Messages
- Embed Links
Welcome/Leave
Configuring the welcome module is done with this command. This will allow for posting welcome and/or leave messages for people and utilize rich embeds and direct messages to best fit your needs. Multiple welcome messages are made possible with the !welcome add [name] feature.
There are many subcommands to the welcome module, each with their own unique purpose. This section will have a lot of information to process, so please re-read this as many times as it takes in order to set your welcome to the best fit for your community. Instead of the conventional format as seen in the previous pages, this section will have a specialized list for the subcommands and what to understand about each of them.
Welcomes will not be posted for users blocked by BlankAvatar and JoinAge.
Both !welcome and !leave have the same subcommands and will be sharing the same table.
!setwelcome, !setchannel, !settype, !setdelete, !setleave, are no longer the commands for setting up the welcome module; it has changed to !welcome and !leave. !welcome and !leave cannot be ran by on their own to start the setup process. A subcommand must be used to with the command in order to change the module's properties.
Required Permissions (Staff)
- Send Messages
- Attach Images
- Embed Links (Admin)
Syntax
!welcome subcommand [input or arguments to set]
!leave subcommand [input or arguments to set]
Examples
Instead of the conventional example list and because there are many subcommands for the welcome and leave commands, a detailed table for all the subcommands and their applicable inputs are listed below.
| Subcommand | Descriptive Example |
|
current |
- Displays all current settings in the welcome module |
| type |
- What kind of message do you want Gaius to send with newcomers/leavers?
The type with the greatest freedom of customization is embed. Text is better for a short and simple design. |
| add/rem |
- Adds or removes a welcome/leave to or from the list by name
|
| channel |
- Sets the designated channel for the welcome/leave |
| autodel |
- Sets how many seconds to wait to delete the welcome/leave message - Using either |
| explain |
|
Notes
Two options are available for setting up welcomes:
- Making it from scratch
- Using pre-made templates to modify as needed.
Templates can be found below.
Variables
The Display Variables MUST be listed with line breaks and in the order in which it appears in the table below.
This
is
a
line
break
| Display Shortcodes | Shortcodes |
| $plain: | %user |
| $plain: disable | %guild |
| $title: | %tag |
| $desc: | %id |
| $thumb: | |
| $img: | |
| $field: | |
| $color: | |
| %user% | |
| %guild% |
Template Examples
Example #1
!welcome add $plain: plain text goes here
$title: Title
$desc: Description
$thumb: URL (or use https://%user for user avatar)
$img: URL
$field: Field name %% Content
$color: Any type of color code accepted by Discord
Example #2
!welcome add $plain: This is plaintext, it goes above the welcome message
$title: This is the title, it is in bold text at the top
$desc: This is the description of the embed, it goes directly below the title
$thumb: %user
$field: This is the field name %% This is the field value
$color: #18d76e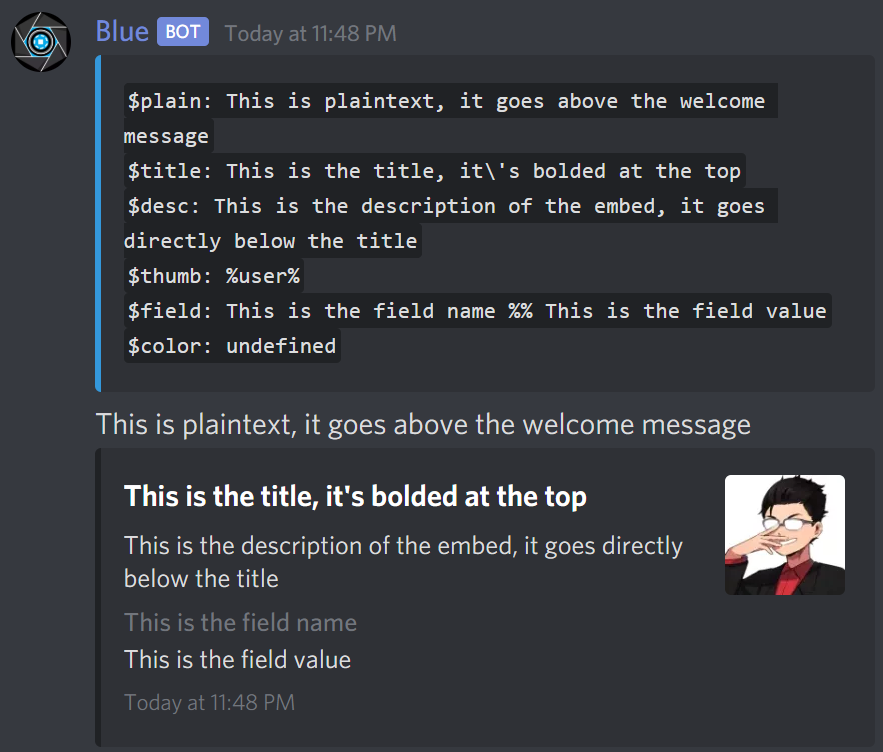
FAQ
Q. Will kicking Gaius reset the bot?
- No, kicking/banning Gaius will never reset your settings or prefix.
Q. How do I see all the commands?
- The help command is man's best friend (not dogs).
Video
Not yet available
If you have or find a video on Gaius specifically for what is covered in this documentation page, you can send the info to Fairy 狐 紫#0001 via DM (You must be in the support server in order to make contact).
Points of Interest
Staff Handbook
Bot Logging/Exlog
Verification Module
Anti-Spam Protection
Wordlist Filtering
Tickets
Make sure that your tickets module is enabled before configuring the tickets module (!module tickets to enable, and !module list to see if it's enabled).
Setting Up Tickets Module
The command used for setting up the tickets module is pobox, which has a set of other subcommands that allows you to edit the module's current settings without the need to remember several commands. The tickets module allows for a modmail system in which your community members can interact with your staff about issues, suggestions, reports, etc.
The list below details the minimum needed permissions in order for the tickets module to function:
- View Channels
- Send Messages
- Embed Links
- Manage Channels (to open and close ticket system channels)
Pobox
As previously stated, this is the only command needed for the configuration of the tickets module. The other commands within the tickets module are solely used for moderation purposes, aside from !send.
Make sure that your tickets module is enabled before configuring the tickets module (!module tickets to enable, and !module list to see if it's enabled).
Required Permissions (Staff)
- Send Messages
- Attach Images
- Embed Links (Admin)
Syntax
!pobox subcommand [input or arguments to set]
Examples
Instead of the conventional example list and because there are many subcommands for the pobox command, a detailed table for all the subcommands and their applicable inputs are listed below.
| Subcommand | Descriptive Example |
|
current |
- Displays all current settings in the tickets module |
| channel/category |
- For channel, sets which channel new ticket notifications are posted - For category, sets the category where all ticket handling channels to be created |
| agelimit |
- Sets how old an account must be before they can submit a ticket |
|
responsetype |
- Sets the message type received after submitting a ticket to either text or embed |
| newmailtype |
- Sets the notification's message type of new mail to either text or embed |
|
newmail/response |
- For newmail, sets what the notification for new mail will say or in a discohook link form - For response, sets the message to be sent to the person who submits a ticket |
| forcedump |
|
NewMail & Response Variables
NOTE: When using newmail and response, you are allowed to use multiple variables listed below.
These variables can be used anywhere in the message.
The variables listed below provide a more tailored response and notification system for your modmail tickets system. As a reminder, these variables can be used anywhere in the response or newmail.
| Variable | Description | Where Can I Place This? |
| %name | Mention of ticket sender | Anywhere |
| %tag | Username#### of ticket sender | Anywhere |
| %id | UserID of ticket sender | Anywhere |
| %date | Date of ticket submission | Anywhere |
| %tid | TicketID | Anywhere |
| %mid | MessageID from ticketing channel | Anywhere |
| %guild | Server name | Anywhere |
| %content | Entire ticket contents | Anywhere |
| %uimg | Avatar URL of ticket sender | Anywhere |
Moderation Commands
The commands listed below are used solely for moderation purposes. It's possible to allow some of these commands for trusted senior moderators with the allow command. Restricting the command to a certain channel helps instill a process for your staff to utilize in the community's tickets system.
This table will get an update soon.
| Command | Description | Example |
| !assign userID ticketID | Opens the ticket and assigns it to the staff | !assign userID ticketID |
| !unassign userID ticketID | Unassigns a staff from the ticket | !unassign userID ticketID |
| !closeticket ticketID | Closes and marks resolved the ticket, marks it resolved, and deletes the channel If requested, creates a full dump of the channel |
!closeticket ticketID |
| !ticketstatus ticketID | Displays the ticket status | !ticketstatus ticketID |
| !blockticket userID | Prevents that user from sending tickets | !blockticket userID |
| !unblock userID | Re-allows that user to send tickets | !unblock userID |
Send (Public Command)
Anyone can use this command except for those in panicd or muted.
| Command | Description | Example |
| !send | Sends a completely private ticket to the server staff Upon activation, the bot will DM you and ask for input, waiting up to 10 minutes. NOTE: You must allow DMs to be sent from server members in your privacy settings. |
!send |
FAQ
Q. Will kicking Gaius reset the bot?
- No, kicking/banning Gaius will never reset your settings or prefix.
Q. How do I see all the commands?
- The help command is man's best friend (not dogs).
Video
Not yet available
If you have or find a video on Gaius specifically for what is covered in this documentation page, you can send the info to Fairy 狐 紫#0001 via DM (You must be in the support server in order to make contact).
Points of Interest
Staff Handbook
Bot Logging/Exlog
Verification Module
Anti-Spam Protection
Wordlist Filtering
Roles
Make sure that your roles module is enabled before configuring the roles module (!module roles to enable, and !module list to see if it's enabled).
Setting Up the Roles Module
There are a few commands used for setting up the roles module, which help create and customize your self-assignables, auto roles, and special roles. The roles modules is intended to provide a detailed means of utility, additional roles management, source of automation to help your staff focus more on moderating and interacting with your community.
The list below details the minimum needed permissions in order for the roles module to function:
- View Channels
- Send Messages
- Manage Roles
- Connect (for adding voice roles)
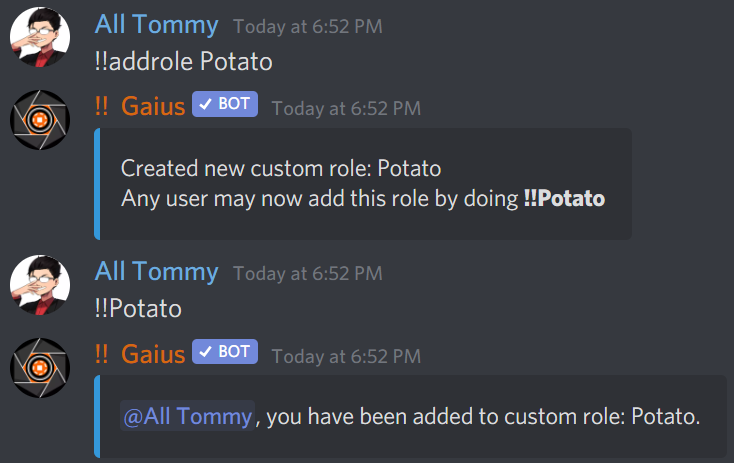
Addrole
Make sure that your roles module is enabled before configuring the roles module (!module roles to enable, and !module list to see if it's enabled).
This command takes a Role Name or roleID
Before you can begin customizing your roles in the module, they must first be added to a special list of roles that tells Gaius that it is allowed to work with. If a role is not added, then it cannot have its behavior customized with the roleopt command below.
Required Permissions (Staff)
- Manage Roles (Admin)
Syntax
!addrole rolename/roleid
Example
!addrole Citizen | Adds the role to Gaius' list of custom roles
Roleopt
This command takes a Role Name or roleID
After a role has been added to the list, any person can self-assign or remove the role to or from themselves by, using the above example, saying !Citizen. This can be prevented by giving the role the lock option to disable the assignment/removal of the role via command.
The subcommands for roleopt are set, add, and rem. Add will add more options to the current list of options that have already been set to the role, rem will remove certain options that are currently set to the role, and set will set or overwrite all previous options that were set on the role to the new options, which means that saying !roleopt RoleName set auto will remove all other options that could have been set on this role and then add the auto option to the role.
Other options for customizing your roles are available in a detailed table below.
Required Permissions (Staff)
- Connect (for the voice option)
- Manage Roles (Admin)
Syntax
!roleopt role view
!roleopt role add/rem/set option, [option], [option]
Examples
!roleopt Citizen view | Lists the current options that are set to the role
!roleopt Citizen set auto | Sets the Citizen role to be automatically assigned to a newcomer
!roleopt Citizen add perma, lock, reset, timed 5 | Adds the perma, lock, reset, and timer options to Citizen
!roleopt Citizen rem lock | Removes the lock option from the list of applied options from the Citizen role
!roleopt Citizen set auto, perma | Sets (overwrites all previous options to the new options) auto and perma to Citizen
Roleopt Options
Below are the available options for customizing your roles with the roleopt command, each with their own descriptive example to help you gain an understanding on what they are used for and what they can do.
| Subcommand | Descriptive Example |
|
view
|
- Displays the current options for the given role |
|
unique |
- Adds/removes a role to a unique list of roles Unique 1 is considered the first list of roles in this option. If a person has a role in this list number and receives another role that is also in this unique list number, then the previous role will be removed from them because they are unique from one another and cannot be shared with the same person. |
| timed |
- Adds or removes a timer on the role - If the number is positive, then the role will be removed after X minutes - If the number is negative, then the role will be added after X minutes The # can be either positive or negative (i.e. 23 and -4). |
| voice |
- Adds a role onto a person when they join a voice channel Gaius must be able to see and connect to the voice channel in order to give it to a person who joins a voice channel |
|
pair |
- Adds the first role to someone when they are given the second role The first role (the role that is given the roleopt option of pair added to it) will be added to the person only when the second named role as given to them. This is not possible the other way around. The second named role will not be added to the person if the first role is given to them. |
| lock |
- Removes the ability for a person to self-assign the role via command |
|
perma |
- Sets the role to be permanently assigned to someone |
| auto |
- Sets the role to be automatically assigned to a newcomer |
| reset |
- Sets the role to be able to be reset (removed from everyone) with the reset command |
| age |
- Sets the person's age requirement to X number of days for the role |
Delrole
This is a very simple command that will simply remove the role from Gaius' role list. After sending this command, you will also be asked if you would like to delete the role from the server to. Saying yes to this prompt will result in the deleting of said role.
Required Permissions (Staff)
- Manage Roles (Admin)
Syntax
!delrole rolename/roleid
Example
!delrole Citizen | Deletes the role from Gaius' list of custom roles
Other Commands
These commands are simple and not a part of the setup of the roles module, but help provide some utility to the module to help the staff see their roles, gather info about roles and see approximately how many people have which role.
Rolelist
Required Permissions (Staff)
- (Mod)
Syntax
!rolelist
Example
!rolelist | Lists all the roles currently in Gaius' list of custom roles.
Roleinfo
Roleinfo is able to gather information about a role and says approximately how many people have the role.
Required Permissions (Staff)
- (Mod)
Syntax
!roleinfo [role]
Example
!roleinfo | Lists all the roles in the server
!roleinfo Citizen | Displays info on the role Citizen and how many people have the role assigned to them
Manually Assigning Roles
Self-assignables, auto roles, and specially assigned roles are not the only means to assign roles to community members with the roles module. Another feature is manually assigning roles to or from members. There are various ways to operate the command, such as only adding the role to members if they don't have it and vice versa, assign/remove a role to all members who have a certain role, all human users, or even bots.
Required Permissions (Staff)
- Manage Roles (Admin)
Syntax
!role bots/all [+/-]role
!role role/member [+/-]role
Example
!role bots +Megazoid | Assigns the role to all bots
?role @Citizen -@Beep Beep | Removes the role for all users with a certain role
!role all Beep Beep | For all people, removes the role if they have it, assigns the role if they don't have it
!role @yeetmaster#3000 Citizen | For the person, removes the role if they have it, assigns the role if they don't have it
Reaction Roles (Premium)
This is a feature reserved for Gaius Cicereius+, our Premium bot.
Reaction roles are not a part of the roles module, therefore you do not need to enable the roles module to set up and operate the setrolereact command.
Reaction roles are not a part of the roles module, but they are tied into the roles management and utilities for your community. You can have multiple reaction role systems set up, transfer reactions from one message to another, and add or remove certain reactions from an existing system without dismantling it.
There is only one command used during the configuration of reaction roles (setrolereact) with a set of subcommands that follow. some of the subcommands allow for tweaks and editions to your currently existing reaction role systems without the need to restart the entire process.

Setrolereact
Examples
Instead of the conventional example list and because there are many subcommands for the setrolereact command, a detailed table for all the subcommands and their applicable inputs are listed below.
| Subcommand | Descriptive Example |
|
!setrolereact |
- Begins the process for setting up a new reaction roles system Please carefully read and follow all instructions during the setup to ensure proper configurations and prevent the need to edit a system multiple times during the first setup. |
|
current |
- Displays all current settings in the reaction roles system - Providing a message ID displays the current system on the message |
| delete |
- Deletes the reaction role system from the given message |
| restart |
- Restarts the reaction role setup process for an already existing system |
|
move |
- Moves an existing reaction roles system from one message to another |
| addreact |
- Adds a reaction role to an existing system. Supplying the @role is mandatory. |
|
deletereact
|
- Deletes a reaction role from an existing system. Supplying the @role is mandatory. |
FAQ
Q. Will kicking Gaius reset the bot?
- No, kicking/banning Gaius will never reset your settings or prefix.
Q. I have Gaius Blue and can't set up reaction roles. Is it broken?
- The reaction roles system is currently only available for Gaius Cicereius+ (the orange bot) users, and the feature works as intended and is not broken.
Q. Do I enable roles module for reaction roles?
- No, reaction roles is a feature on its own and is separated from the roles module. It is in this page because it is relevant to providing extra roles management and utilities to your community.
Q. How do I see all the commands?
- The help command is man's best friend (not dogs).
Video
Not yet available
If you have or find a video on Gaius specifically for what is covered in this documentation page, you can send the info to Fairy 狐 紫#0001 via DM (You must be in the support server in order to make contact).
Points of Interest
Staff Handbook
Bot Logging/Exlog
Verification Module
Anti-Spam Protection
Wordlist Filtering
Purger
Make sure that your purger module is enabled before configuring the purger module (!module purger to enable, and !module list to see if it's enabled).
Purging Messages & Channels
There is no configuration for the purger module. It only has one command, purge, which offers a huge selection of options to customize Gaius' message cleaning. The maximum number of messages that can be deleted at one time is 500. The oldest messages Gaius will search for it 2 weeks to save resources due to Discord API limitations.
Purge
Required Permissions (Staff)
- Manage Messages (Admin)
Basic Examples
There isn't a need to understand the entire functional possibilities in order to use the purge command. Sometimes, only deleting a number of messages or a number of messages from a person or role is good enough. Deleting messages that contain a certain word is just as easy.
|
Command |
Descriptive Example |
|
!purge amount |
- Purges 10 messages from the channel |
|
!purge amount @mention |
- Purges 10 messages from a specific user in the channel |
|
!purge amount @rolemention |
- Purges 10 messages from a specific role in the channel |
|
!purge amount text |
- Purges 10 messages with that text/letter in the channel |
Advanced Examples
The listed modifiers below give your purging process some extra oomph to its accuracy and precision. These modifiers are attached at the end of the command message. As a helpful tip, you can still use the examples above while adding the modifiers below at the end.
|
Modifier |
Descriptive Example |
|
--startat |
- "Start at this message ID and work your way downward" |
|
--stopat |
- "Work your way upward until you get to this message ID" |
|
--range |
- "Start at this message ID, but don't go past that message ID" |
|
--startswith |
- "Delete messages that starts with the word 'pancakes'" |
|
--includes |
- "Delete messages that has the word 'pancakes'" |
|
--endswith |
- "Delete messages that has the word 'pancakes' at the end" |
|
--mentions |
- "Delete messages that have this specific mention" It is possible to use more than one mention for a wider search. |
|
--links |
- "Delete messages that have a link" |
|
--bots |
- "Delete messages created by bots" |
|
--images |
- "Delete messages that have an attachment" |
|
--invites |
- "Delete messages that have a server invite link" |
|
--embeds |
- "Delete messages that contain embedded text" |
|
--not |
- "Invert, or make into the opposite of, whatever other modifiers I gave you" In the given example, this would result in the Gaius deleting any message that was NOT sent by a bot. |
FAQ
Q. Will kicking Gaius reset the bot?
- No, kicking/banning Gaius will never reset your settings or prefix.
Q. How do I see all the commands?
- The help command is man's best friend (not dogs).
Video
Not yet available
If you have or find a video on Gaius specifically for what is covered in this documentation page, you can send the info to Fairy 狐 紫#0001 via DM (You must be in the support server in order to make contact).
Points of Interest
Staff Handbook
Bot Logging/Exlog
Verification Module
Anti-Spam Protection
Wordlist Filtering
Commands
Make sure that your commands module is enabled before configuring the commands module (!module commands to enable, and !module list to see if it's enabled).
Creating Custom Commands
There is no configuration for the commands module. It only has three commands: learn, unlearn, and cmds. Learn tells Gaius to learn an new custom command unique for your server. Every custom command is capable of being customized for added security, utility, or fun for your community, staff, and members. Custom commands can even be used to assign special roles to people, or even remove it. Unlearn removes the custom command, and cmds lists all your community's custom commands along with their contents and shortcodes.
Learn
Learn tells Gaius to learn an new custom command unique for your server. Every custom command is capable of being customized for added security, utility, or fun for your community, staff, and members. Custom commands can even be used to assign special roles to people, or even remove it. When using the learn command, you say !learn CommandName This is a message followed by whatever shortcodes you want to associate the new custom command with. CommandName will be the new name of the new custom command. In order to use the newly created custom command, you would say !CommandName.
Required Permissions (Staff)
- Embed links
- Manage Roles (Admin)
Basic Examples
There isn't a need to understand the entire functional possibilities in order to use the purge command. Sometimes, only deleting a number of messages or a number of messages from a person or role is good enough. Deleting messages that contain a certain word is just as easy.
|
Shortcode |
Descriptive Example |
Placement |
|
%content/%message |
- Sends the specified response message |
Beginning |
|
%target |
- Targets a person to mention in the command In this example !yeet @yeetmaster#3000 will result in a pinged message to the target user with the message saying yeet. Mentioning one person to target will only result in the first specified person to being the target for the custom command. This shortcode will not successfully operate as intended without the %dm shortcode for the command. |
Anywhere |
|
%mention |
- Mentions the specified person in the command message If no person is or userID is used in the command message, then the person who sent the command message will be mentioned instead. |
At the end |
|
%embed |
- Sends an embedded message |
At the end |
|
%c |
- Sends an embedded message with a specified accent color Accent color is the left-side colored bar on the embedded message. %c accepts any hexadecimal color code |
At the end |
|
%dm |
- Sends the message YEEEEETTT in DMs |
At the end |
|
%option |
- For use with the 'list' option, whatever valid option from the 'list' is used will be placed here. |
|
|
--deny= |
- Denies the permission of a certain role from using the command You can use more than one role for this shortcode |
At the end |
|
--role= |
- Toggles, adds, or removes a role from whomever uses the command You can use more than one role for this shortcode |
At the end |
| --list=
|
- A list of valid inputs for the custom command
|
At the end |
|
%admin, %mod, %helper |
- Learns |
At the end |
|
%cd |
- Sets the cooldown for the command to 10 seconds The maximum limit for cooldown is 9,999,999 |
At the end |
Unlearn
A very simple command to remove a currently existing custom command from your community. Once the command is deleted, it's deleted for good unless you re-add the custom command with the learn command.
Example
!unlearn CommandName
Cmds
Another very simple command for the commands module. This command will display all of the custom commands within your community along with each of their contents and relative shortcodes.
Example
!cmds
FAQ
Q. Will kicking Gaius reset the bot?
- No, kicking/banning Gaius will never reset your settings or prefix.
Q. How do I see all the commands?
- The help command is man's best friend (not dogs).
Video
Not yet available
If you have or find a video on Gaius specifically for what is covered in this documentation page, you can send the info to Fairy 狐 紫#0001 via DM (You must be in the support server in order to make contact).
Points of Interest
Staff Handbook
Bot Logging/Exlog
Verification Module
Anti-Spam Protection
Wordlist Filtering
Moderation
Staff Handbook
This page is used for quick command references for mods and helpers for moderating and keeping their community safe. For more details on the commands, please see relative pages for each of the modules/sections.
General Moderation
These commands are for the majority of the basic moderation commands ranging from warns to bans, and even voice chat tools.
Modlogs
| Command | Descriptive Example |
| !modlogs enable/disable | !modlogs enable |
| !modlogs delete User | !modlogs delete @ModGod#3000 |
| !modlogs User | !modlogs @ModGod#3000 |
Warns
|
Command |
Descriptive Example |
|
!warn member [reason] |
- Warns the person |
|
!bulkwarn WarnedUserID % Moderator % Reason |
- Sends a warning to multiple people - This must be used in this syntax or it will not work as intended |
|
!rewarn warnID/member [New reason here] |
!rewarn 638 Did not share popcorn
- Updates the reason for an existing warning |
|
!warnlist member |
- Displays all the warnings the person has |
|
!warnlist reason search text |
- Displays all warnings with the specified text |
|
!warnlist mod member |
- Displays all warnings the mod has sent |
|
!warnlist all |
- Displays all warnings in your server |
|
!pardon WarnID |
- Pardons the warn |
Mutes
| Command | Descriptive Example |
|
!mute member [time] [reason] |
- Mutes the person - Time length types: 1d 1h 1m 1s |
|
!unmute member |
- Unmutes the person |
|
!mutelist |
- Displays all active mutes in the server |
Kicks
| Command | Descriptive Example |
|
!kick member [reason] |
- Kicks the person from the server |
|
!kick member member [reason] |
- Kicks multiple people |
|
!softban member [reason] |
- Kicks a person and clears their messages from today |
Bans
| Command | Descriptive Example |
|
!ban mention/UserID reason |
- Bans the person from the server |
|
!unban username |
- Unbans the person from the server |
| !tempban mention/UserID time reason |
- Temporarily bans someone from the server - Time length types: 1d 1h 1m 1s |
| !tempbanlist |
- Lists all active temporary bans in the server |
| !allbans |
- Lists all active bans in the server |
Voice Chat Tools
|
Command |
Descriptive Example |
|
!vcmute member [time] |
- Voice mutes the person for X minutes |
|
!vcunmute member |
- Voice unmutes the person |
|
!vckick member |
!vckick @yeetmaster#3000 @yeetmaster#3001
- Kicks user(s) from the voice channel |
Message Moderation
These commands will help keep your community walls, boards, floors, and chats clean, calm, and collective.
Purger
| Command | Descriptive Example |
|
!purge amount |
- Deletes the amount of messages |
|
!purge amount @mention |
- Deletes the amount of messages from the person |
|
!purge amount @role |
- Deletes the amount of messages sent by anyone with the role |
|
!purge amount text |
- Deletes the amount of messages with that text/letter |
Slowmode
| Command | Descriptive Example |
| !slowmode |
- Displays all current slowmode settings |
| !slowmode server off/number |
- Sets slowmode in the entire server to 5 seconds |
| !slowmode channel off/number |
- Sets slowmode in a certain channel to 5 seconds |
Channel Locks
| Command | Descriptive Example |
|
!lock |
- Disables @everyone perms to talk in that channel |
|
!lock light role |
- Locks the channel to a certain role |
|
!unlock |
- Re-enables @everyone perms to talk in that channel |
| !freeze |
- Removes all channel permissions - Disables @everyone perms to talk in that channel
Do not ever use this command a second time in a row. This command requires administrator before and during freeze and thaw or else channel permissions will not be properly restored. |
| !thaw |
- Restores the server to its previous state The warning above is a requirement in order to properly restore the server to its previous state before the freeze command was made. |
Verification Moderation
There is only one command which provides a powerful means to help a newcomer with their verification woes.
Manual Verification
| Command | Descriptive Example |
| !manualverify member |
- Manually verifies a person into the server |
Ticket Moderation
These commands enable the staff to manage and moderate the modmail or tickets in the community. The send command is a public command that anyone can use.
Ticket Moderation
| Command | Descriptive Example |
| !send |
- Sends a completely private ticket to the server staff - THIS IS A PUBLIC COMMAND. ANYONE CAN USE IT. |
| !assign userID ticketID |
- Opens the ticket and assigns it to the staff |
| !unassign userID ticketID |
- Unassigns a staff from the ticket |
| !closeticket ticketID |
- Closes and marks the ticket as done and deletes the channel |
| !ticketstatus ticketID |
- Displays the ticket status |
| !blockticket userID |
- Prevents that user from sending tickets |
| !unblock userID |
- Re-allows that user to send tickets |
Information Gathering
These commands help you gather publicly available information about a user, role, or channel, which can be helpful in making moderation decisions or working with a configuration setup.
General Information
| Command |
Descriptive Example |
|
!getid channel/role/member |
- Displays the ID of whatever was mentioned |
|
!user member |
- Displays detailed information about a user |
|
!get member |
- Displays basic public information on a person |
|
!rapsheet member |
- Displays a person's punishment history |
|
!roleinfo role |
- Displays detailed information about a role |
|
!guildinfo |
- Displays detailed information about the server |
Name Moderation
Only one command for managing the nicknames of people with less tasteful, hard to read, or harmful names.
Nicknames
| Command | Description |
| !nick member newNickname |
- Changes a person's display name |
Utilities
The say command is a powerful tool for adding embedded messages, sending messages through the bot, or having a little fun.
Say Command(Sending Messages with Gaius)
| Command | Description |
| !say [optional #channel] Message here. |
- Sends a plain text in the channel |
| !say [optional #channel] %e Message here. |
- Sends an embedded message |
| !say [optional #channel] %e %c#000000 Message here. |
- Sends an embedded message with a color hex tag |
Voice Chat Tools
The voice chat tools available with Gaius to mute unwanted or harmful voice communications, to take them out of the voice channel altogether.
Commands
Vckick
Vckick can simply kick someone out of a voice channel if that's what you prefer, however vckick has a few other options available for making a more complex action in one command.
Vckick's role function is a powerful moderation booster to help keep unruly people our of your voice channels and maintain a safer and cleaner environment for your fellow members to relax in. If your community has a special role that your members earn from activity or trust and that the role is designed for voice channel permissions, then it would remove the earned privilege from the person who broke the trust. This is done permanently.
Required Permissions (Staff)
Move Members
Manage Roles (Mod)
Examples
|
Command |
Descriptive Example |
|
!vckick [mine/channel] [role] |
- Kicks everyone out of your current voice channel
- Kicks everyone out of the vc and removes the role from them |
|
!vckick member |
- Kicks the person from the voice channel |
Vcmute/Vcunmute
These 2 are very simple commands designed to be like the regular mute and unmute commands, except for voice channels and without using roles. Gaius will simply apply the Server Mute function on the user so that they cannot speak or unmute themselves in your voice channels. It's a handy tool for the harmful, super awkward, or uncomfortable speakers or spammers.
Required Permissions (Staff)
Mute Members (Mod)
Examples
|
Command |
Descriptive Example |
| !vcmute member [#w #d #h #m #s] [reason] |
- Voice mutes the person permanently
- Voice mutes the person for a period of time. Time format is explained below: |
| !vcunmute member [reason] |
- Unmutes the person from voice channels, allowing them to speak |
FAQ
Q. Will kicking Gaius reset the bot?
- No, kicking/banning Gaius will never reset your settings or prefix.
Q. Will vckick keep from from coming back into the voice channel, like a ban from voice channels?
- Not in the basic sense but it is possible with the [role] function. If the vckicked person is actually a botted account, they are likely not going to try to rejoin anyhow. If it's an actual human, they might try to join back if they so choose to unless they did not have permission to join the voice channel in the first place.
- It would help to vcmute an unruly speaker as a substitute.
Q. How do I see all the commands?
- The help command is man's best friend (not dogs).
Video
Not yet available
If you have or find a video on Gaius specifically for what is covered in this documentation page, you can send the info to Fairy 狐 紫#0001 via DM (You must be in the support server in order to make contact).
Points of Interest
Staff Handbook
Bot Logging/Exlog
Verification Module
Anti-Spam Protection
Wordlist Filtering
Panic Mode
The configuration features for automated panic mode is reserved for Gaius Plus only. Learn more
Setting up Panic Mode
There is only one command to the panic mode feature. This is a fairly simple and straightforward tool that helps monitor and detect raids to your configurations and takes action upon panic mode being triggered.
Panic
This is the only command for the panic mode function. Premium users have the freedom to make it as strict as allowable or a relaxed as allowable to use what fits best for their community. Communities with higher traffic might need to have a more relaxed system to better detect anomalies, while slower moving servers can use the stricter settings. Configuring the settings for users and settings in the command is currently only available for Gaius Plus users.
Gaius has to have Manage Roles permission or else panic mode will not work.
Required Permissions (Staff)
Manage Roles (Admin)
Examples
| Command | Description |
| !panic current |
- Displays the current panic mode settings |
| !panic on/off |
- Toggles panic mode
- Turns panic mode on
- Turns panic mode off |
| !panic auto on/off |
- Toggles automated panic mode
- Turns automated panic mode on
- Turns automated panic mode off |
| !panic users number |
- Sets the number of server joins required to trigger panic mode This feature is reserved for Gaius Plus only. Learn more |
| !panic seconds number |
- Sets the number of seconds needed between joins to increase the trigger number This feature for is reserved for Gaius Plus only. Learn more |
What Do the Numbers in the Last Two Rows Above Mean?
Using the example above, the users is set to 10 and the seconds is set to 12. If we were to say 10 people must join the server within 12 seconds, then that would be incorrect. The time is not based on only the first person who joined; it is based on the previous person who joined the server.
To help clarify this, let's consider users to simply be a number, only a number.
If Sarah (1) joins the server, the number becomes 1. If 12 seconds has passed by and John joins at 13 seconds after Sarah (1), then Sarah is no longer counted, and John becomes 1. So the triggered number is staying at one.
If Josh (2) joins 6 seconds after John (1), the number is 2. If 12 seconds pass and no one else joined after Josh, then the number goes back to 0. No raid has been detected.
If one troll joins the server, and then another troll joins after 2 seconds, the number is 2, then 8 more join in less than 5 seconds between each join, the number jumps to 10, and causes Gaius to trigger the automated panic in the server. This is because there were 10 people who joined the server with less than 12 seconds between each join.
FAQ
Q. Will kicking Gaius reset the bot?
- No, kicking/banning Gaius will never reset your settings or prefix.
Q. Can I customize my panicd role?
- Sure! Roles are remembered by ID, so changing the name and color shouldn't affect performance.
Q. How do I see all the commands?
- The help command is man's best friend (not dogs).
Video
Not yet available
If you have or find a video on Gaius specifically for what is covered in this documentation page, you can send the info to Fairy 狐 紫#0001 via DM (You must be in the support server in order to make contact).
Points of Interest
Staff Handbook
Bot Logging/Exlog
Verification Module
Anti-Spam Protection
Wordlist Filtering
Channel Management
These commands allow you to have some control over some channels and keep out unwanted or unwelcomed guests.
Lock/Unlock
REQUIRED PERMISSIONS:
Manage Channels
Manage Permissions
Locks are small "freezes" that simply disables @everyone's ability to speak in the channel. This is useful in situations where reporting is needed for serious raids or trolls who have sent some malicious content.
Lock light allows you to keep certain people from speaking while keeping the channel free and available to your regulars or trusted members, which is useful for countering raid and trolls if you have a role designed for every newcomer in your community.
Commands
| Command | Descriptive Example |
| !lock |
- Locks the channel from everyone |
| !lock light [channel] [role] |
- Locks the current channel from the specified role
- Locks the specified channel from the specified role |
| !unlock light [channel] [role] |
- Unlocks the current channel from the specified role
- Unlocks the specified channel from the specified role |
| !unlock |
- Unlocks the channel for everyone |
Freeze/Thaw
This feature is reserved for Gaius Plus only. Learn more.
REQUIRED PERMISSIONS:
Administrator
Manage Channels
Manage Permissions
Freeze the server by denying everyone permission to speak or add reactions, for after raid clean up and mid-raid stopping. Thaw a server from "freeze" restoring all previous permissions that were present before the freeze. A channel thaw is possible in cases in which there are channels that are okay for community members to talk in while a freeze is on place. Thawing roles and individual people are also possible with the thaw command.
If something goes wrong with your permissions or if you would like to go back to a certain "thaw" point because some perms were lost or wrong after another thaw, you can thaw recover the server to a certain point. Please note that you will not have any recoveries available during your first freeze because the server has not been thawed for its first time. Every server thaw will save a snapshot of permissions for the channels involved and give it a unique ID (timestamp). If you are uncertain of the timestamp, you can simply say thaw recover, and you will be given the list of currently available timestamps to choose from.
Staff
| Command | Descriptive Example |
| !freeze |
- Freezes all channels from all non-admins |
| !thaw recover [timestamp] |
- Recovers an old backup of previously saved permissions The timestamp is a unique ID generated every time a server is frozen and then thawed. You will not have any recoveries available during your first freeze. |
| !thaw channel/role/member |
- Restores the specified channel's permissions for everyone
- Restores the specified role's ability to see channels and speak in the server
- Restores the specified person's ability to see channels and speak in the server |
FAQ
Q. Will kicking Gaius reset the bot?
- No, kicking/banning Gaius will never reset your settings or prefix.
Q. Why can't a see my timestamps?
- Timestamps are only made after each time a server thaw has been made, so no timestamp will be available during the first ever server freeze.
Q. How do I see all the commands?
- The help command is man's best friend (not dogs).
Video
Not yet available
If you have or find a video on Gaius specifically for what is covered in this documentation page, you can send the info to Fairy 狐 紫#0001 via DM (You must be in the support server in order to make contact).
Points of Interest
Staff Handbook
Bot Logging/Exlog
Verification Module
Anti-Spam Protection
Wordlist Filtering
SmartPrune
SmartPrune checks for and removes either people in your server currently missing a profile picture, or avatar, or invites that have been used less than a certain number of times. If you don't want people to know why they have been pruned from your server, you can say nomessage at the end of the command. This will tell Gaius not to send a message about why the pruned members were removed.
Examples
| Command | Descriptive Example |
| !smartprune avatar [nomessage] |
- Kicks everyone who doesn't have a profile image REQUIRED PERMISSIONS: |
| !smartprune norole [nomessage] |
!smartprune norole nomessage
- Kicks everyone who does not have a role REQUIRED PERMISSIONS: |
| !smartprune invite uses |
- Deletes all invites used less than a certain number times |
FAQ
Q. Will kicking Gaius reset the bot?
- No, kicking/banning Gaius will never reset your settings or prefix.
Q. Can I use smartprune for inactive people?
- This is not currently a feature. The best possible alternative is to use Discord's prune feature for people, however this will only prune people who have not logged into Discord for a certain period of time (including people with certain roles).
Q. How do I see all the commands?
- The help command is man's best friend (not dogs).
Video
Not yet available
If you have or find a video on Gaius specifically for what is covered in this documentation page, you can send the info to Fairy 狐 紫#0001 via DM (You must be in the support server in order to make contact).
Points of Interest
Staff Handbook
Bot Logging/Exlog
Verification Module
Anti-Spam Protection
Wordlist Filtering
Auto-moderation
Audit Logging
REQUIRES: Manage Messages, Embed Links
Standard Logging
Doing !log all in a channel will automatically enable all log types to be posted in that channel.
| Command | Descriptive Example |
| !log current |
- Displays the current logging settings |
| !log all channel/off |
- Enables/Disables all logging in that channel |
|
!log logtype channel / off |
- Sets a certain logging type to the channel
- Removes a certain logging type from the channel |
|
!log pingroles add/rem logtype Role |
- Adds a role to be pinged when a certain log is made |
|
!log pingroles rem all |
- Removes all roles that were designated to be pinged when certain logs were made |
|
!log pingroles list |
- Displays the list of roles designated to be pinged whenever a certain log is made |
Available Log Types
-
Bans
- Kicks
-
Warns
-
Mutes
-
Images
-
Spam
-
Filters
- Settings
- Notifications
- Joinwatch
- Errors
Extreme Logging
This feature is reserved for Gaius Plus only. Learn more.
| Command | Description |
| !exlog current | Displays the current extreme logging settings |
| !exlog all | Toggles all types on/off to be sent in that channel |
| !exlog logtype(s) #channel | Sets that log type to the specified channel channel |
| !exlog logtype off/-1 | Disables that log type |
| !exlog ignore channel | Exlogs will not record that channel |
| !exlog recog channel | Exlogs stop ignoring that channel |
Exlog Types
| Name | Logs |
| memberadd | User joins, account age and other user information |
| memberremove | User leaves, when they joined and what roles they had |
| memberupdate | Nickname changes, roles and so forth per user |
| username | Username changes |
| userpic | When users change profile pictures, displays previous if possible as well |
| vcjoin | When users join a voice channel and which one |
| vcleave | When users leave a voice channel and which one |
| vcchange | When users change voice channels and to which ones |
| messagedelete | Deleted messages, content, author, channel etc |
| messagebulk | This will detail when a BOT mass deletes messages. It will dump a text file with a collection of message_delete style logs |
|
messageupdate |
Logs before and after copies of edited messages |
|
rolecreate |
Logs when a role is created |
|
roleupdate |
Logs when a role is edited and what was changed |
|
roledelete |
Logs when a role is deleted |
|
channelcreate |
When channels are created |
|
channeldelete |
When channels are deleted |
|
channelupdate |
When channels are edited |
Anti-Spam
We offer highly customizable anti-spam. The settings are off by default, but, if you'd like to configure them yourself, you can view that information below. You may also turn off any of these settings by supplying the number -1. Notify and name doesn't need -1.
Commands
Auto
The commands below are purely for example purposes and are in no way whatsoever suggestions on what to set for your server. Every community is unique in its own way and should be configured in its own unique way to best fit your community's needs.
| Command | Descriptive Example |
|
!auto current |
!auto current
-Displays current anti-spam settings |
|
!auto spamtime/mentiontime/duplicatetime number |
!auto spamtime 5
-Sets the number of seconds (or less) needed for another message by the same person to be considered spam !auto mentiontime 5
- Sets the number of seconds (or less) needed for another message with a mention by the same person to be considered spam !auto duplicatetime 5
- Sets the number of seconds (or less) needed for a duplicated message by the same person to be considered spam |
|
!auto spamlimit/mentionlimit/duplicatelimit number |
!auto spamlimit 5
- Sets the message limit needed before beginning deleting the next messages or spam by that person !auto mentionlimit 5
- Sets the message (with a mention) limit needed before beginning deleting the next messages or spam by that person !auto duplicatelimit 5
- Sets the duplicated message limit needed before beginning deleting the next messages or spam by that person |
|
!auto emoji/newline/mention number |
!auto emoji 5
- Sets the maximum number of allowed emojis in a single message !auto newline 5
- Sets the maximum number of allowed line breaks in a single message These !auto mention 5
- Sets the maximum number of allowed mentions in a single message |
|
!auto duptolerance number |
!auto duptolerance 5
- Sets a stricter rule on similar messages previously sent by the same person In this example: |
Autoset
|
Command |
Example |
| !autoset current | !autoset current |
| !autoset nostickers/namecensor/modstaff [on/off/true/false] |
!autoset nostickers on !autoset namecensor false !autoset modstaff true |
| !autoset autowarn public/dm/off | !autoset autowarn dm |
| !autoset cooldown/mutetime number |
!autoset cooldown 5 !autoset mutetime 15 |
| !autoset punishment warn/mute/kick/ban/off number [number...] |
!autoset punishment warn 1 2 3 !autoset punishment mute 2 !autoset punishment kick 3 !autoset punishment ban 4 |
| !autoset blankavatar mute#/kick/ban | !autoset blankavatar mute5 |
| autoset imagecensor a/t/e |
!autoset imagecensor e e - family friendly |
JoinAge
REQUIRES: Ban, Kick or Manage Roles (if mute).

Setup
Sets the account age restriction for the server as well as the punishments executed upon violation.
| Command | Descriptive Example |
| !setjoinage current |
- Displays current settings. |
|
!setjoinage off |
- Disables setjoinage |
|
!setjoinage punishment mute/kick/ban #days/#d #h #m #s |
- Mutes accounts under the age of 6 days.
- Kicks accounts under the age of 5 hours and 30 minutes.
- Bans accounts under the age of 30 minutes. |
| !setjoinage #days/#d #h #m #s |
- Kicks accounts under the age of 3 days. |
| !passport userid |
- Allows that user to bypass joinage. |
BlankAvatar
Requires: Ban, Kick or Manage Roles (if mute).
Setup
Requires users that join to have a custom avatar in order to join. Failure to have one will result in the set punishment.
| Command | Description |
| !autoset blankavatar |
- Toggles the blankavatar filter |
| !autoset blankavatar mute#/kick/ban |
- Mutes users, who have no avatar, for 6 minutes
- Kicks users with no avatar |
| !passport userid |
- Allows that user to bypass blankavatar |
Banned Words and Filters
Wordlist Management
REQUIRES: Manage messages
|
Banned word example |
|

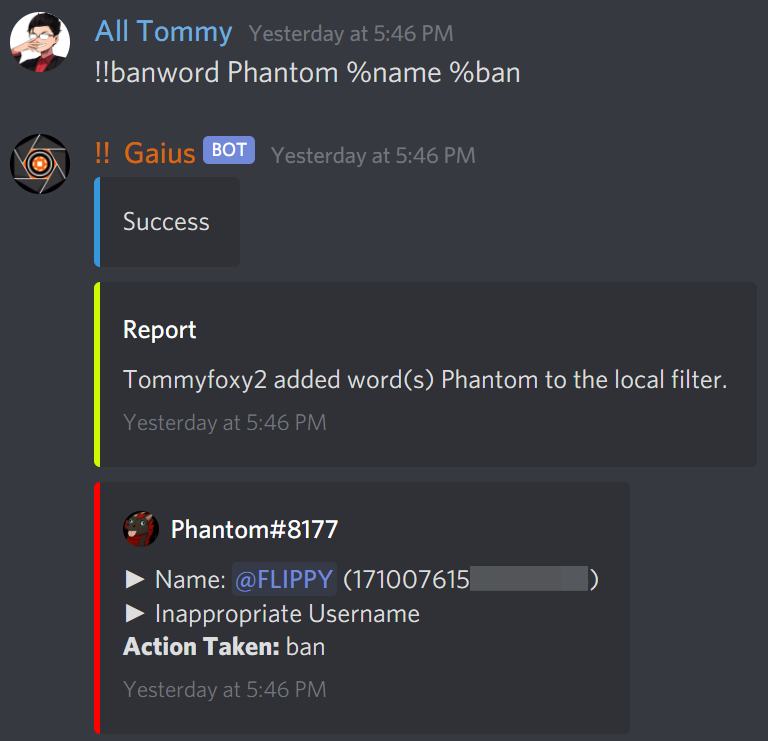
Banword/Unbanword
Bans a word by adding it to a specified wordlist. If no word list is specified, then banned words will be added to the "local" wordlist. You may upload a text file (.txt) with a list of words separated by a new line instead.
| Command | Descriptive Example |
|
!banword word/phrase |
- Bans the word and adds it to the "local" wordlist |
|
!banword name ListName word/phrase |
- Bans the word and adds it to the Naughty wordlist |
|
!banword insert your regex here %regex |
- Bans a custom regex Regex is a complicated matter, which may result in unexpected filter behavior. |
|
!unbanword word/phrase
!unbanword name ListName word/phrase
!unbanword id WordID#
|
- Unbans and removes the word from the "local" wordlist !banword name Naughty nibba
- Unbans and removes the word from the Naughty wordlist
- Unbans the word based on its unique ID number |
Variables
| Variable | Description |
| %whole | Only the exact match |
| %begin | Only from the beginning of words |
| %end | Only from the end of words |
| %case | Case-sensitive (100% match only) |
| %mute | Auto permanent mute |
| %mute # | Auto mute for certain amount of minutes |
| %warn | Auto warn |
| %kick | Auto kick |
| %softban | Auto softban |
| %ban | Auto ban |
| %ban # | Auto ban for certain amount of days |
|
%name |
Only applies to names/nicknames |
| %new
|
Only matches the word or phrase against the name censor ONLY to new members who join the server |
|
%hoist |
De-hoists people who try to get to the top of the alphabetical member list on the right side if they have a particular name or symbol
The %name nor %begin flag are needed when using the %hoist flag |
|
%regex
EXAMPLE: !banword b[il1]+t{2,}(er|a)' %regex |
Applies your given regex
EXAMPLE: Blocks common variations of the word bitter |
|
%notify
|
Posts a log through the Notifications logging channel |
|
%notifynd
(REQUIRES: Notifications logging enabled) |
Posts a log through the Notifications logging channel
This will not delete the banned word. |
You can filter usernames based on your banned words with !auto name which checks whenever someone joins your server or whenever a name is updated.
(Learn more)
Wordlist
| Command | Descriptive Example |
| !wordlist list |
- Displays the list of current wordlists in the server along with their info |
| !wordlist view name [serverid] [readable] |
- Sends a list of banned words in an editable .json file It is entirely optional to use a server ID and "readable" in the command. The server ID is primarily meant for cases in which the wordlist did not originate in your server, and that the wordlist is added to your server with the Typing "readable" at the end of the command will output a .txt file instead of .json. This is easier for when you only want to look at it and not re-upload an edited version of the file. |
| !wordlist create ListName |
- Creates a new wordlist with a name It is possible to use an edited .json file, template can be found with |
| !wordlist delete ListName |
- Deleted the wordlist form the server |
| !wordlist formfile |
- Sends a .json template for banning words in bulk when uploading a .json file This is useful for when using the |
| !wordlist add/rem name serverid |
- Removes another server's non-locked wordlist to yours
- Removes another server's non-locked wordlist from yours |
| !wordlist clear name |
- Clears all banned words from the wordlist without deleting the wordlist |
| !wordlist update name *attach a file* |
- Replaces ALL words with words that are listed in the uploaded file |
| !wordlist addflag/remflag name flag |
- Adds the mute flag to ALL WORDS in the wordlist
- Removes the mute flag from ALL WORDS in the wordlist |
Managelist
| Command | Descriptive Example |
|
!managelist applyto/unapplyto name [serverid] channel/role |
- Applies the wordlist to only the target channel, meaning that only the specified channel is where the wordlist will be enforced
- Removes the wordlist enforcement from the given role\ Unapply will always override an Applied role or channel Adding a serverID clarifies which wordlist to apply/unapply. If no serverID is provided, then the first wordlist with the given name will be used. |
| !managelist applyto/unapplyto current |
- Displays the current list of roles and channels to which a wordlist has been applied to
- Displays the current list of roles and channels to which a wordlist has been unapplied to |
| !managelist lock/unlock name |
- Prevents other servers from viewing the wordlist's contents
- Allows other servers to view the wordlist contents |
| !managelist public/private name |
- Allows other servers to "wordlist add" the specified wordlist
- Disables other servers from adding your wordlist |
| !managelist enable/disable name [serverid] |
- Enables a wordlist that was added from "wordlist add" This will immediately put the enabled wordlist into moderating effect
- Disables the wordlist enforcement and keeps the wordlist |
| !managelist merge/unmerge name serverid |
- Merges another server's non-locked wordlist to yours This will not immediately put the merged wordlist into moderating effect
- Removes another server's non-locked wordlist from your local filter |
Filter/Whitelist
| Command | Description |
| !filter ignore [invert] #channel url/invite/text/auto/activity |
- Ignores url filters in the channel
- Ignores text filters in all channels except for #general |
| !filter recog [invert] #channel url/invite/text/auto/activity |
- Re-enables url filters in the channel
- Re-enables url filters in all channels except for #general |
| !filter view [ignores] |
- Displays currently active filters in the server
- Displays all currently active filter ignores in the server |
| !filter url/invite |
- Toggles the url or invite filter |
| !whitelist list |
- Lists the current whitelisted links and domains |
| !whitelist add/rem link |
- Adds the domain name to the filters' whitelist |
Channel Types
| Command | Descriptive Example |
| !ct #OptionalChannel type |
!ct #memes image
- Sets the channel type for the (specified) channel |
| !ct #OptionalChannel type off |
!ct image off
- Removes the channel type for the (specified) channel |
Types
| Type | Description |
| image | Only allow image attachments without text or url |
| url | Allows urls as well but no other text is allowed |
| text | Allows text only if accompanied by a url or attachment |
BlockTag
REQUIRES: Manage Messages
Block user or role tags in chat so that the message is automatically deleted. You can either define a custom message or let the bot default one for you.

|
Command |
Descriptive Exmaple |
|
!blocktag role/member |
- Blocks the given user/role from being mentioned |
|
!unblocktag ID |
!unblocktag 104425482757357568 !unblocktag @Tommyfoxy2#0001 !unblocktag @Staff
- Removes the existing blocktag restriction from the user/role |
StatTrack
Manage channels to display your server mini-stats and even display a clock for events and such in your community if you so choose.
REQUIRES: Manage channels
Free users are allowed one stattrack channel per feature (for example, one clock channel, one members channel, one online channel, etc).
Gaius Plus users are allowed multiple channels of the same stattrack feature.
Members
A total member count tracker displaying the number of total members when a member comes online, DND, idle, etc., in a customizable channel.
Setup 👑
This is ordered by usage. Start with the first and move down the list. The bold text is required in the command; underlined is the channel name or channel ID; and italics are optional, but recommended.
| Example | Description |
| !stattrack add members channelName/ID | Sets the channel for the member counter |
| !stattrack msg channelName/ID %d Members | Sets the stat format |
| !stattrack enable or disable channelName/ID | Enables or disables the member counter |
| !stattrack delete channelName/ID | Deletes the member counter on that channel (Y/N) |
| !stattrack current | Displays current stat channels, also removes those deleted |
Online
A member online count tracker displaying the number of total online members when a member comes online, DND, idle, etc., in a customizable channel.
Setup 👑
This is ordered by usage. Start with the first and move down the list. The bold text is required in the command; underlined is the channel name or channel ID; and italics are optional, but recommended.
| Example | Description |
| !stattrack add online channelName/ID | Sets the channel for the online counter |
| !stattrack msg channelName/ID %d Online | Sets the stat format |
| !stattrack enable or disable channelName/ID | Enables or disables the online counter |
| !stattrack delete channelName/ID | Deletes the online counter on that channel (Y/N) |
| !stattrack current | Displays current stat channels, also removes those deleted |
Server Age
A server age counter that tracks the age (in days) of the server in a customizable channel.
Setup 👑
This is ordered by usage. Start with the first and move down the list. The bold text is required in the command; underlined is the channel name or channel ID; and italics are optional, but recommended.
| Example | Description |
| !stattrack add age channelName/ID | Sets the channel for the age counter |
| !stattrack msg channelName/ID %d days old | Sets the stat format |
| !stattrack enable or disable channelName/ID | Enables or disables the age counter |
| !stattrack delete channelName/ID | Deletes the age counter on that channel (Y/N) |
| !stattrack current | Displays current stat channels, also removes those deleted |
Clock
A clock that updates every 5 minutes, capable of displaying the day of the week, month, year, timezone, etc., in a completely customizable message in a customizable channel.
Setup 👑
This is ordered by usage. Start with the first and move down the list. The bold text is required in the command; underlined is the channel name or channel ID; and italics are optional, but recommended.
The list of applicable time zones can be found here.
| Example | Description |
| !stattrack add clock channelName/ID | Sets the channel for the clock |
| !stattrack msg channelName/ID %t %tzPST | Sets the stat format |
| !stattrack enable or disable channelName/ID | Enables or disables the clock |
| !stattrack delete channelName/ID | Deletes the clock on that channel (Y/N) |
| !stattrack current | Displays current stat channels, also removes those deleted |
Variables
| Variable | Description | Example Display |
| %wd | Weekday | Sunday |
| %t | Time | 8:49 pm |
| %tzZONE %tzPST %tzEST %tzCST etc... |
Timezone to use | PST |
| %-DST | Stops using DST time | |
| %24 | 24HR clock | 21:49 |
| %d | Day of the week | 7 |
| %m | Month | 9 |
| %y | Year | 2020 |
Some examples would be
| Example | Example Output |
| Currently %wd %t %tzEST %-DST | Currently Sunday 8:49pm |
| %d/%m %t %tzEST %24 | 14/7 21:49 |
| %wd %d/%m %y | Sunday 14/7 2019 |
| %t %tzEST %wd | 8:49 pm Sunday |